Friday, July 8, 2011

Squid stuffed with Ricotta, Breadcrumbs, Chilli and Marjoram


Squid is one of the more unique ingredients that you can cook with. I often find that it’s one of those very divisive forms of food – either you love it or you hate it. I know many people that dislike it because it seems ‘weird’, maybe because of the way it looks or because it can sometimes have a rubbery consistency of not cooked well. Indeed, squid needs to be cooked properly and served with other ingredients and spices for it to be appetising. The worst thing is for squid to be overcooked – it then forms an extremely rubbery consistency that makes it difficult to bite through. If eaten on its own, let’s admit it, it’s pretty bland. However, not much is needed to lift it to something delicious. I’m sure many of us will recall wonderful days during our summer childhood having crumbed calamari with lemon squeezed over the top of it, and dipping it into tartar sauce. That’s certainly how I fell in love with squid. I absolutely loved calamari. The only thing that I found annoying was sometimes the chefs would forget to cut the squid properly, and as such there would be a tight ‘elastic band’ of squid that I nearly choked on innumerable times!

Another form of squid that I love is found in Chinese cooking – salt & pepper squid. Whenever I go to yum cha with friends, there has to be salt & pepper squid. Once again, the flavours aren’t extravagant, but the seasoning and the chilli really lift the squid to a different dimension. The last time I went for yum cha at the Marigold in Sydney, I found my arm constantly reaching out to the salt & pepper squid plate so much that I’m quite confident I had at least three-quarters of it! So I knew that my mouth and my heart were telling me that I needed to cook a squid dish, and I had previously been drawn to this recipe, from Tobie Puttock, because of the idea of cooking the squid whole and stuffing them with wonderfully fresh and delicious ingredients, not to mention the added spiciness that I love from chillies in a dish. I’ve recently cooked quite a few of Tobie Puttock’s recipes, including my first gnocchi dish ever, and I’ve become a very big fan. His recipes display great modern Italian food and provide twists that traditional recipes often lack.

I recall seeing on a television cooking show the process of chopping up a whole squid, with the ink sac attached, and nine times out of ten the ink sac would puncture and black ink would gush all over the squid. So, I decided that I would actually just buy the squid tubes themselves, and I was pleasantly surprised at the price. The first process of the recipe is to make the breadcrumbs. The old me would have used pre-packaged breadcrumbs, but now I cringe at that thought. When I combined all of the ingredients and the ciabatta and put them in the oven, the smell was amazing! It was nearly impossible to resist eating some of the bread when it came out of the oven. As I’ve mentioned before, I often marvel at how people, such as myself, can overcome their dislike for certain foods. I majorly hated onion when I was young, to the point where I would pick out the smallest bits of onion from the spaghetti Bolognese for around ten minutes before I would start eating. If I was really sick and I knew throwing up would do me good, all I had to do was think about French Onion soup (that’s a nice passage for a cooking blog isn’t it!). Now I love the stuff. In the case of this recipe, it’s anchovies. I now love them, and they provide beautiful saltiness and oiliness to the dressing. One thing I’m still a bit tentative about is ricotta. I recall cooking a pasta dish with ricotta around eight years ago that I disliked quite intensely, but now I just find it rather bland and unappealing. I’m sure it added flavour to this recipe, but I don’t think I’ll ever be a great fan. I think one of the reasons why this recipe is so good is that, while it looks complicated, it’s actually quite simple. There are only three elements – the stuffing, the dressing and the squid. When combined, it’s a taste explosion. The squid was so tender – absolutely no hint of any rubber! I think this dish would convert many people that are a bit equivocal regarding squid.

Recipe (serves 4):

500g squid tubes, with tentacles
4 tbs ricotta
1 tbs marjoram, roughly chopped
Finely grated zest & juice of 1 lemon
2 cloves garlic, finely chopped
1 tbs freshly grated parmesan cheese
Sea salt
Freshly ground black pepper
Extra virgin olive oil for flavour & dressing
Olive oil for greasing
3 anchovy fillets, roughly chopped
2 fresh red chillies, finely chopped
1 tbs flat-leaf parsley, chopped
A small handful of feathery fennel tops or celery leaves

Breadcrumbs
1 small loaf ciabatta bread
1 tbs rosemary leaves, finely chopped
1 tsp dried chilli (optional)
3 tbs olive oil
Sea salt
Freshly ground black pepper

Preheat the oven to 220 degrees C.

To make the breadcrumbs, break the ciabatta into 5cm pieces. Place on a baking tray and scatter with rosemary and dried chilli. Drizzle with olive oil and season with salt & pepper. Bake until the bread turns a rich golden colour. Shake the tray from time to time so the bread cooks evenly.

After the bread has cooled, place it in a food processor and pulse it to the consistency of coarse sand. You can also rub it between the palms of your hands. Set aside.

Bring a saucepan of salted water to a boil. Cook the squid tentacles for about 10 mins; drain, then rinse in cold water. Chop roughly then set aside.

Reduce the oven temperature to 180 degrees. In a mixing bowl bring together the ricotta, breadcrumbs, marjoram, lemon zest, garlic, parmesan and chopped tentacles. Season for taste and add a good splash of extra virgin olive oil. Use a spoon or piping bag to fill the squid with the ricotta stuffing, then secure the ends with toothpicks.

Place a sheet of greaseproof paper on a baking tray, and smear it with some olive oil (it’s easiest if you use your hands to do this). Place the stuffed squid tubes on the baking tray and cook in the oven for 8-12 mins or until the squid turns white.

In the meantime, get the dressing going. Put the anchovies, chillies and parsley in a bowl large enough to accommodate the squid. Pour in just enough extra virgin olive oil to make a rough paste. Season with salt & pepper and add a squeeze of lemon juice. Transfer the squid from the baking tray to the bowl; use tongs to rotate the squid to coat it with the mixture.

Arrange the tubes on plates and drizzle with the remaining anchovy dressing. Finish with cracked pepper, another drizzle of extra virgin olive oil and a scattering of fennel tops or celery leaves.

Category: Italian
Source: “Daily Italian” by Tobie Puttock
Rating: Five stars

Monday, July 4, 2011

Baghdad Eggs on Simple Flatbread


This is a perfect breakfast dish to make on a lazy, Sunday morning. I had intended to make it on the Saturday, but I hadn’t read the recipe carefully, and as such didn’t realise the amount of time required to make the bread and to let it prove before the main part of the breakfast, namely the eggs, can begin to be prepared. So on a sunny Sunday morning, I rolled up my sleeves and began making my first ever form of bread. From the many recipes I’ve read so far, I’ve gathered that it’s very important not to try to make the dough in a food processor – it just doesn’t knead properly. You need to manually knead the dough on a counter in order to make the dough tough. Many times during the process of making the dough, I realised the importance of having a well-floured counter! The dough would stick to the counter and I would begin to think that it would never form a rubbery consistency, but then I would add some more flour to the bench top and the kneading would take off again! I was really happy with the final product, and when I eventually tasted the flatbread on its own, it was of a much superior quality to pre-made breads in a supermarket that are full of preservatives (the bane of modern food!).

Another thing that I’ve discovered over the past few years when cooking breakfast and eggs in particular are methods to use in order to ensure the eggs don’t burn. I used to cook fried eggs simply with some oil, and obviously they would sputter everywhere and, when they weren’t burnt, they were invariably as dry as my humour often is. Now, I cook fried eggs by placing a bit of butter in the pan and, importantly, adding some lemon juice. The lemon juice stops the butter from burning, and so the eggs cook wonderfully and turn out exactly as you want them, whether sunny side up or, well, whatever the other types are called (for years and years I didn’t even know what sunny side up referred to – I thought it was maybe a special American sauce to go with the eggs!!!). So I used lemon in this recipe, and it is also used to provide further acidity by splashing some over the top of the finished product and flatbreads. The combination of the ground cumin seeds and mint leaves provides that wonderful Middle Eastern twist to what would be considered a relatively standard breakfast, and the lemon enhances these flavours. Another reason why this is a wonderful breakfast dish is that it isn’t heavy, and the flavours leave you feeling light and refreshed. I was very proud after cooking this dish, as it was the first bread I had ever made, and it gave me a great deal of relaxation and enjoyment to make this breakfast. I’ll certainly make it again!

Recipe (serves 1):

½ tsp cumin seeds
20g butter
1 clove garlic, thinly sliced
1 tbs lemon juice
2 free-range eggs
Sea salt & freshly ground black pepper
8 mint leaves, thinly sliced

Simple Flatbread
125g plain flour, plus extra for dusting
¼ tsp salt
2 tsp extra virgin olive oil
1/3 cup tepid water

To make the flatbreads, put the flour and salt in a food processor. With the motor running, trickle in oil and enough tepid water to make a dough, processing for 1-2 mins (without breaking the machine!!!) until mixture forms a ball. If mixture is too moist, add more flour.

Turn the dough onto a workbench lightly dusted with flour and knead until it feels smooth and silky. Place in a bowl and cover with a clean tea towel. Leave at room temperature for at least 30 mins.

Preheat oven to 100 degrees celsius and put a baking tray inside to warm.

Divide dough into four pieces each about the size of a small egg, then use a rolling pin to roll into flat rounds on a floured workbench.

Heat a heavy-based cast-iron frying pan over high heat until very hot; there is no need for any oil. Slap a dough round into it. Cook for 2-3 mins or until little burnt blisters appear, then turn to cook the other side. Keep warm on the baking tray in the oven while cooking remaining flatbreads and eggs.

Dry-roast cumin seeds in a small frying pan over medium heat until fragrant, then tip into a mortar and grind with a pestle to a powder. Tip into a small bowl until needed.

Meanwhile, melt butter over medium heat in a small non-stick frying pan. When butter starts to foam, drop in garlic and cook for 30 secs until it just starts to change colour. Add lemon juice and eggs and fry gently until set. Sprinkle over cumin. Serve on warm flatbread or toast, seasoned with salt & pepper and sprinkled generously with thinly sliced mint.

Category: Iraqi/Middle Eastern
Source: “Kitchen Garden Companion” by Stephanie Alexander
Rating: Four stars

Friday, July 1, 2011

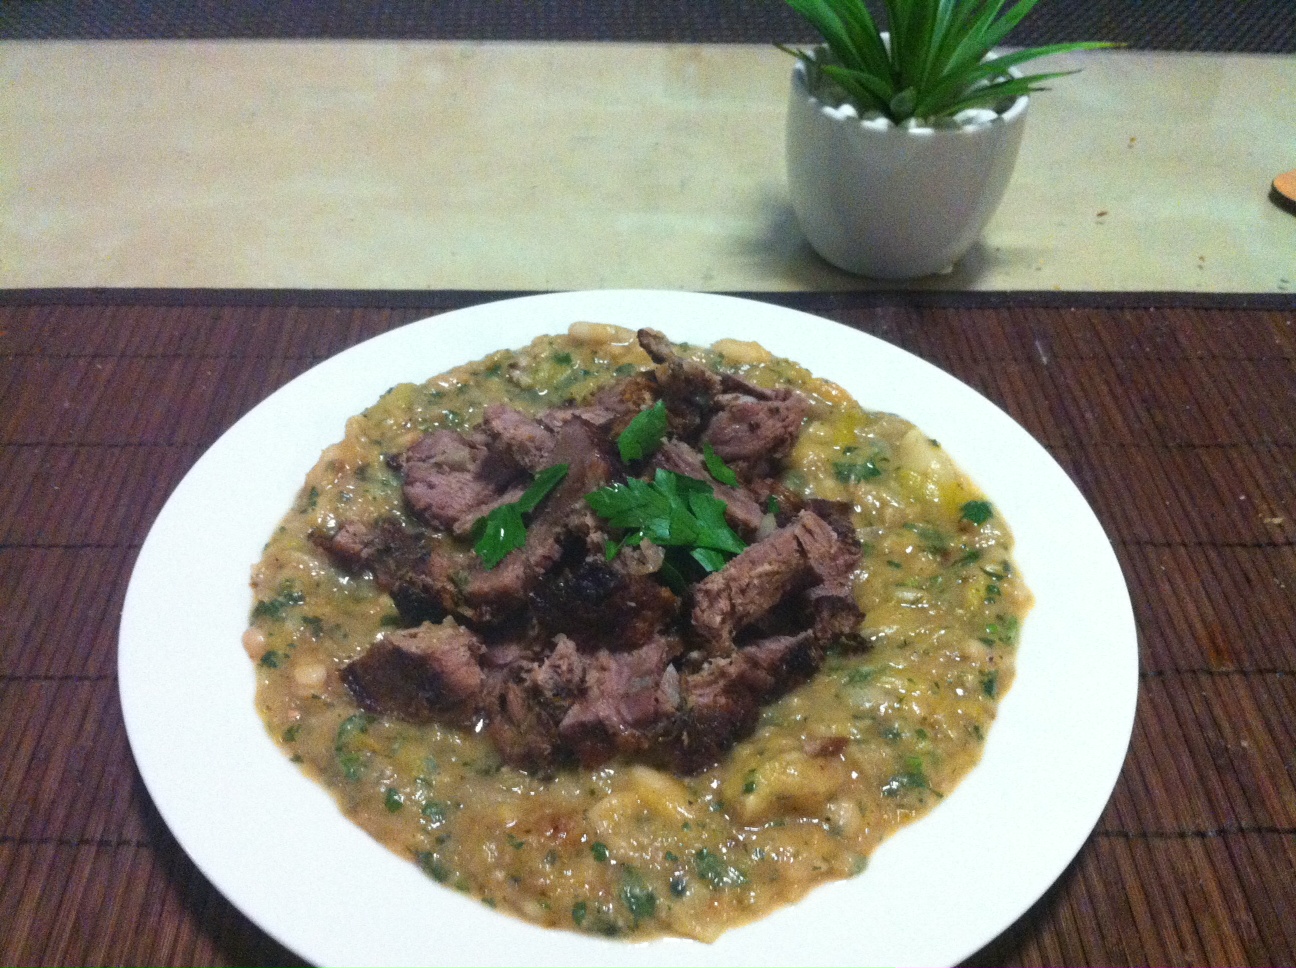
Roast Lamb with Beans


Lamb is probably my favourite meat, and I come to that conclusion not just because of how tender and delicious it can be in dishes, but because it was the food I missed the most while I was living in Thailand. You basically can’t find lamb anywhere in Thailand except for expatriate pubs, and I definitely didn’t go to Thailand to associate with drunken English ‘farangs’ who had no interest in immersing themselves in Thai culture and customs. So the first thing I always asked for from my mum when I paid visits to Sydney was Roast Lamb. It’s actually quite ironic, given that I used to hate roasts of any kind, finding them bland and boring. Maybe it’s one of those things that grows on you with age, such as wine and staying in rather than getting drunk and enduring a hangover the next day. I was even thinking to myself today how averse I’ve become to the thought of having a hangover – so much so that I really have no desire at all to get drunk at all! I suppose that’s a good thing, isn’t it, but I think it’s a sign that I’m approaching thirty.

Indeed, I would cook lamb frequently if it wasn’t for the outrageously high cost of it. My mum was telling me a few months ago how much lamb used to cost just after her and dad had gotten married, and it amazed me! Roast lamb and the more prime cuts of lamb are becoming luxuries in our day and age. For example, I bought some lamb to cook an African Peanut Stew yesterday, and just pure diced lamb (not specified as shoulder or leg) cost me $25. I’m going to have to stretch that food for a while! This recipe, one of the earlier recipes in my cooking journal, is also a Jamie Oliver recipe (don’t worry – my sources are very diverse), and I decided to cook it because I’ve really come to enjoy leeks and I was intrigued about the combination of the lamb with the bean mixture.

As always, I enjoyed the preparation of this meal just as much, arguably even more, than the meal itself. I just find the process so relaxing, and I sit on a stool in my kitchen preparing the ingredients with a beer and some comedy on in the background – I’ve recently gone through the entire Seinfeld season again just during my cooking. I think the combination of relaxing with the food, the beer and the comedy has an effect on me, because when I looked back over my notes for this recipe, I saw this arbitrary entry that simply went “I wish I was Kramer!” I have absolutely no idea how, at the time, I thought that was somehow connected with the process of cooking this dish. Anyway, one of the techniques that infused the lamb with flavour was to stab it all over and to stuff it with the garlic, thyme and rosemary. It smelled absolutely beautiful. Preparing the bean mixture was also quite enjoyable, and seemed like an example of very rustic French cooking. The direction to blitz half of the bean mixture reminded me how Jamie Oliver loves contrasting textures, such as in his Mushroom Risotto with the contrast between the oozy mushrooms in the risotto and the grilled and crispy mushrooms on top of the risotto. Perhaps the most important thing that I learnt about cooking lamb from this recipe was how to get the meat right. In other words, there are only two ways to cook lamb – relatively quickly, or very slowly. Cooking it quickly results in red and moist meat, while cooking it slowly (my preference) makes it tender and allows it to fall apart. While I was very happy with the result, I think I became stuck in no-man’s land between these two methods of cooking. I was cooking it slowly, but I was becoming so tired and hungry that I decided to cut the cooking short and eat it as is. Nevertheless, the lamb was delicious and the beans gave it that satisfying accompaniment.

Recipe (serves 4):

2kg leg of lamb
Sea salt and freshly ground black pepper
Olive oil
8 garlic cloves, peeled
Small bunch of fresh thyme
Couple of sprigs of fresh rosemary
3 medium leeks, peeled and sliced diagonally 2cm thick
2 onions, finely sliced
1 bay leaf
2 small bunches of fresh parsley
4 x 400g tins of flageolet (or cannellini) beans
1.5L lamb, chicken or vegetable stock

Preheat the oven to full whack. Stab the lamb all over with a small sharp life, then rub all over with a good pinch of salt and pepper and a lug of olive oil. Slice 4 garlic cloves and poke the slices into the incisions made, along with some small sprigs of thyme and rosemary. Put the tray on the top rack of the oven.

Add the leeks, onions and remaining garlic cloves to another roasting tray with a good lug of olive oil, along with a good pinch of salt and pepper. Place on a medium heat and cook, stirring occasionally, for 15 minutes or until the leek and onions have softened.

Add a bouquet garni of the bay leaf, remaining thyme and 1 bunch of parsley and add to the leeks, together with the tinned beans and their juices. Pour in the stock, give a stir and put in the oven.

Reduce the oven temperature to 180 degrees and cook for 1¼ hours. While the meat rests for 15 minutes, place the beans on a high heat and reduce to desired consistency.

Remove the beans from the heat when ready to serve and spoon a third of them into a bowl. Mush them up then stir them back through the rest of the beans to make them creamy. Finely chop the remaining parsley and stir through the beans. Serve the lamb over the beans.

Category: French
Source: “Jamie does...” by Jamie Oliver
Rating: Five stars

Tuesday, June 28, 2011

Dry-Fried Sichuan Beef


Chinese cooking is one of the most diverse forms of food in the world. This probably isn’t surprising given the fact that China has a population of 1.3 billion people and is the fourth largest country in the world by land mass. People in the Western world often associate Chinese food with simple and westernised dishes such as Honey Chicken, spring rolls and Kung Pow Chicken. While these are certainly tasty dishes in their own right, the depth and variety of Chinese cooking is extraordinary, and often is not exemplified well in Western countries, although I believe we are lucky in Australia (particularly Sydney) to have so many excellent Chinese chefs and restaurants, and as such we have a closer appreciation of genuine Chinese cuisine. The restaurant that instantly comes to mind is The East, right at the steps of the Sydney Opera House. Its dishes are mouth-wateringly delicious and the setting could not be more perfect. And incredibly, it’s actually not too expensive, which is amazing given everything in Sydney costs you nearly another mortgage!

Chinese food ranges from province to province, from the lush and dense east coast to the arid, desert setting of the west, not to mention all of the provinces in between, such as Sichuan province. Certainly, Chinese people are known to have intriguing eating habits, and not all Chinese food is exactly appealing. We all know the dogs used in Southern Chinese cooking, and I recall a TV special leading up to the Beijing Olympics displaying one of many Chinese restaurants that specialise specifically in ‘genital’ dishes. The journalist, I believe, had a lovely taste of deer penis, which many Chinese people believe has medicinal and spiritual qualities and is often used as an aphrodisiac. While I have eaten fried cockroaches in Western Thailand, I’m quite sure that I would have to leave the dog and penis dishes to their local fans. However, this is a mere microcosm of Chinese cuisine, and Chinese food is eaten with passion in Chinatowns in every major city throughout the world.

This dish obviously comes from Sichuan province, roughly in the middle of China, and is a recipe I picked up from perhaps Australia’s best Chinese chef, Kylie Kwong. Sichuan food, to my recollection at least, is well known for its spicy and exotic qualities, and this recipe is a perfect example of its cuisine, although without a huge hit of heat. I’ve watched all of Kylie Kwong’s cooking DVDs, and I love how she has such passion for the food of her homeland and how she makes her recipes relatively simple to follow. If anything, her recipes in Simple Chinese Cooking are too basic, but they do provide an excellent introduction to cooking Chinese food, and illustrating the basic elements of Chinese dishes, such as how to make Sichuan salt and pepper used in this dish and many others. I will definitely buy her other cookbooks which, I believe, delve further into Chinese food and explore more exotic and complicated dishes, although often the simplest dishes, done well, are the most delicious. One of the great tips I picked up from Kwong that I now use all the time is, when I need to cut beef or steak into thin slices, to wrap the beef tightly in cling-film and place it in the freezer for half an hour. It really works, as it makes it so much easier to cut the beef into thin strips of meat appropriate for stir-fry.

I loved this dish, and I didn’t go light on the shredded iceberg lettuce leaves – I found that they provided a delicious contrast to the meat and enhanced the flavours. I really enjoyed making the Sichuan pepper and salt, and I now have a big tub of it stored for future cooking. By the way, this is something I’ve been meaning to say – in my recipes, I always increase the amount of garlic, as all my friends know that I’m a garlic fanatic. I never thought I would be worse than my brother – when I was younger I would sometimes get home and the house (very big) would absolutely reek of garlic. I have remembered to edit the recipes so far to reflect the actual amount of garlic called for (for example, I used 5 garlic cloves in this recipe, not 2), so if one of my recipes happens to call for an absurd amount of garlic, please prompt me with a comment to make sure I haven’t forgotten to edit it appropriately.

Recipe (serves 2):

2 x 300g beef fillets
1½ cups vegetable oil
2 large red chillies, finely sliced
1 tbs finely diced ginger
2 garlic cloves, finely diced
2 tbs Hoisin sauce
2 tsp Sichuan pepper & salt
1 cup finely sliced spring onions
Extra pinch Sichuan pepper & salt
½ cup finely shredded iceberg lettuce leaves

Wrap beef fillets in plastic cling wrap. Place on a tray in the freezer for about 30 mins or until slightly firm, so they are easy to slice finely without tearing. Remove plastic cling wrap and, using a sharp knife, cut beef fillets into 5mm pieces.

To make the Sichuan pepper & salt, dry roast Sichuan peppercorns and sea salt (1 tbs Sichuan peppercorns to every 3 tbs sea salt) in a heavy-based pan. When the peppercorns begin to ‘pop’ and become aromatic, take off the heat. Allow to cool, then grind to a powder in a mortar and pestle.

Heat oil in a hot wok until surface seems to shimmer slightly. Add half the beef and stir-fry for 1 min, stirring constantly to prevent beef sticking together. Remove from wok with a slotted spoon, drain well on kitchen paper and set aside. Repeat process with remaining beef. Remove excess oil from wok and wipe clean.

Heat extra oil in the same hot wok. Stir in chilli, ginger and garlic and cook on a medium heat for 30 secs, stirring constantly to ensure garlic doesn’t burn.

Return beef to wok with Hoisin sauce and stir-fry for a further 30 secs. Add Sichuan pepper & salt and stir-fry for 30 secs. Lastly, stir through spring onions.

Arrange beef on a platter, sprinkle with extra Sichuan pepper & salt, and top with lettuce.

Category: Chinese
Source: “Simple Chinese Cooking” by Kylie Kwong
Rating: Five stars

Saturday, June 25, 2011

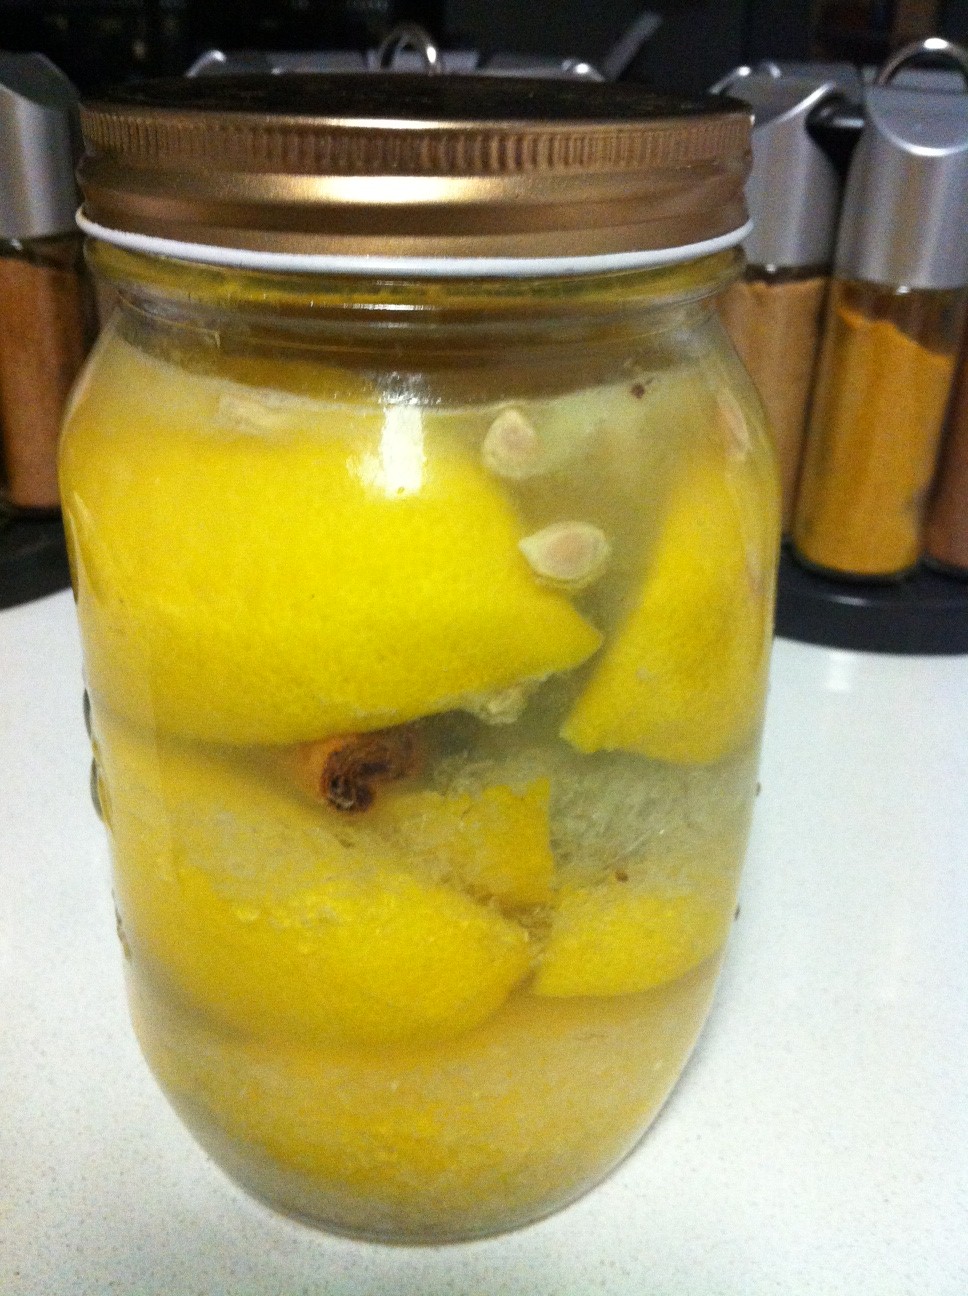
Preserved Lemon


So obviously preserved lemons are not a recipe in and of themselves – I’m sure I don’t need to make that clear but one of my friends may be mistaken. After all, he believed that Paul Newman was famous because of his salad dressings! Need I say more? I decided to prepare preserved lemon because it’s used in North African cuisine quite often, and I was at that stage wanting to cook a Moroccan dish. Also, I saw a recipe from Maggie Beer that called for preserved lemon (I think it was actually a recipe for Moussaka) and became intrigued.

I was completely ignorant of how to go about preserving lemons, but one of my iPhone applications, How to Cook Everything by Mark Bittman has some great features on basic food preparation. The only downside to the recipe is that it isn’t as multicultural in its recipes as it could be, and is very focused on an American audience, which I suppose makes sense given that I’m assuming he’s American. The instructions call for you to pour boiling water in a new or used jar in order to clean it. I followed this and, struggling with the boiling water, managed to get the water out of the jar and, without thinking, subsequently flushed it once more with some cold water to make sure it was clean. I heard a sharp crack, and there went my jar due to the sudden change in temperature! Fortunately, I had bought two jars, so I was able to continue with the preservation.

I enjoyed the process and layering that preserving requires, but when I shook the jar the next day, all of the layers seemed to sink to the bottom, so I became worried that some of the lemons on the upper layers may not preserve properly. It all went quite well though and, although I didn’t particularly enjoy the Chicken, Olive and Preserved Lemon Tagine that I cooked using my preserved lemons, it was well worth while, and I’ve still got some more time to use up the rest of my batch!

Directions:

1.4 kg lemons, preferably unwaxed, quartered lengthwise
110g kosher salt
4cm cinnamon stick
2-3 cloves
1 star anise
2-3 black peppercorns
2 cardamom pods
1 bay leaf

Fill a clean 950ml-sized jar with a tight-fitting lid with boiling water and soak its lid in boiling water too. Let the water sit while you cut the lemons, then dup the water out.

Sprinkle a 5mm-deep layer of salt across the bottom of the jar. Nestle a layer of quartered lemons into the bottom of the jar, sprinkle liberally with salt, then repeat, adding the spices and bay leaf as you go. Stop when the jar is about ¾ full and squeeze the remaining lemons into the jar – seeds and all – so that the fruit is completely submerged in the lemon juice and salt brine.

Set the jar out on a counter and vigorously shake it once a day for 7-10 days. During this time it will start to bubble a little and the dried spices will swell back to their original size.

Refrigerate the lemons and let them continue to cure for another week before using (the lemons will keep for at least 2 months in the refrigerator). When they have cured, unscrew the lid. After a moment, they should smell sweet and citrusy – an ammonia smell means they’ve gone wrong somewhere along the line.

To use in stews, blanch the quartered lemons in unsalted boiling water for 10 secs, just long enough to leech out a little of the salt. For salads or quick-cooled dishes, scrape the flesh away from the peel, discard the flesh, and blanch the peel in unsalted boiling water as above.

Cuisine: Miscellaneous
Source: “How to Cook Everything” by Mark Bittman

Thursday, June 23, 2011

Chicken, Olive and Preserved Lemon Tagine


I had intended to publish this post a couple of days ago, but the last few days have been a bit rough, especially because one of our cats, Maya, who I’m looking after while my parents are away, has come down with pancreatitis and it took a while for us to finally come to that conclusion. Anyway, I’m glad to finally get back to what I like doing – cooking and writing. Around three weeks prior to cooking this recipe, I had prepared some preserved lemons (I will post the instructions for doing this) and was awaiting the outcome. To be perfectly honest, I’m not sure if I had ever actually had preserved lemons before, at least not intentionally, and I was intrigued about their texture and the impact they would have upon a dish.

So I searched for a recipe which not only included preserved lemons, but actually celebrated them and made them a predominant part of the recipe. Many recipes use only small amounts of preserved lemon rind in their recipes, or even use them as garnish on dishes such as Moussaka. This dish, which I found in Jamie Oliver’s Jamie Does..., one of the series of cookbooks that came with the Daily Telegraph recently, seemed the perfect recipe to cook, as not only did I want a dish that used preserved lemons as a primary ingredient, but I was also quite eager to cook a Moroccan dish. The recipe includes up to 3 whole preserved lemons, but I only used 2 because I didn’t want to go overboard on my first time with this ingredient. It was quite interesting dicing up the lemons in preparation for cooking – the flesh of the lemon was almost jelly-like and seemed translucent, and the rind was so wonderfully soft and tender.

Unfortunately I don’t have a tagine, but you can actually substitute a tagine with a heavy-based pot which is what I did and which proved to be adequate for the purposes of cooking this dish, although it would be interesting to cook the same dish using a tagine to see the difference, whether subtle or distinct. As for little tweaks on my own part, I didn’t actually use saffron, but rather a saffron substitute that provides the same effect, at least in terms of colour, and you can see from the photo that the substitute also provides that beautiful, rich yellow that comes from saffron. As I was slicing up the fennel, I was wondering whether it would impact upon my enjoyment of the dish. It’s the first time that I’ve used fennel in my own cooking, and I noticed the distinct aniseed scent which I’m absolutely no fan of. As it turned out, the chicken was beautiful and tender, but I must admit that I just wasn't a fan of the flavours coming out of the recipe. I think the combination of the preserved lemon, the fennel and the olives (which I usually like) provided for too tart a taste for my palate, whereas Asian cuisine, my favourite type of food, generally is sweeter. I’m sure people who prefer less sweetness in their food would love this recipe. Nevertheless, I’m going to cook plenty more Moroccan and North African recipes, and this was just part of my exploration of ingredients and cuisines that I’ve never cooked.

Recipe (serves 4):

1 whole chicken, divided into 4 pieces
Olive oil
1-2 large bulbs of fennel
2 onions, peeled and roughly chopped
Small bunch of fresh coriander
2 garlic cloves, peeled and sliced
2-3 preserved lemons, deseeded & chopped
80g black and green olives, stoned
A good pinch of saffron
500ml hot chicken stock
Couscous

Spice rub
1 heaped tsp coriander seeds, bashed up
1 tsp ground cumin
1 heaped tsp ground ginger
2 tbs olive oil
Sea salt & freshly ground black pepper

Mix all the spice rub ingredients together in a small bowl. Put the chicken pieces in a large bowl, massage them with the spice rub then cover with cling film and put into the fridge to marinate for a couple of hours or, even better, overnight.

Heat a generous lug of olive oil in a tagine or casserole-type pan and fry the chicken pieces over a medium heat, skin side down first, for about 5-10 mins or until golden brown.

While the chicken fries, chop each fennel bulb into 8 wedges and add these to the pan along with the onions, coriander stalks and garlic. Stir well and fry for a couple more minutes, then mix in the preserved lemons, olives and saffron. Pour in the hot stock, give everything a good stir, then cover with a lid or foil and simmer on a low heat for 1½ hours, or until the meat starts to fall away from the bone. Halfway through, have a check and give it a good stir. Add a splash of water if it looks dry.

After 1½ hours, stir gently. If it’s still a bit liquidy, leave it to thicken with the lid off for a bit more. Sprinkle with coriander leaves, and serve with a large bowl of steaming couscous.

Category: Moroccan
Source: “Jamie Does...” by Jamie Oliver
Rating: Two stars

Friday, June 17, 2011

Five Spice Caramel Pork (Thit Heo Kho Tieu)


Someone once said to me that Vietnamese food is like Thai food but without the flavour. While I must admit that Thai food is my favourite cuisine, Vietnamese food can be full of flavour, spice and colour. On my first trip to Vietnam, my friend and I took part in a Vietnamese cooking class at Hoi An, a beautiful town which used to be a Portuguese trading village. I recall making some very decent looking Vietnamese spring rolls, which is quite impressive in hindsight given that at that point in my life I wasn’t exactly highly skilled in the food department, except eating of course! The other major culinary highlight of that first trip was a beautiful, fresh banquet of Vietnamese food on a junk in Ha Long Bay as we made our way to Cat Ba Island.

My second visit to Vietnam, unfortunately, didn’t contain many fond memories at all. I had just begun my time living in Thailand, and I went to Vietnam with a German mate in order to renew my tourist Visa. Throughout that two day trip, we were pick-pocketed, overcharged by the hotel, ripped off by a ‘tourist guide’, nearly involved in a fight through no part of our own, and tricked into going to a ‘karaoke’ club where we found ourselves surrounded by over twenty girls and, within ten minutes (during which we were trying to extricate ourselves from the position we were in), were slapped with a bill for over thirty beers which the girls had apparently had and which we had apparently agreed to pay for!!! Ah, the memories.

At this stage, I’m not too well versed in Vietnamese cuisine. I do enjoy Pho in the morning, although as an Asian breakfast I don’t think you can go past Khao Tom Moo (Thai Rice Soup with Pork), which I have cooked and will post at some stage in the near future. I think Luke Nguyen’s cooking show on SBS, which I managed to see the end of when I returned to Australia, displayed some beautiful dishes and the range of ingredients and recipes in Vietnamese cuisine. I didn’t intentionally seek to cook a Vietnamese dish – rather, I was captured by the picture of this recipe on the iPhone application for taste.com. While I’m usually not a fan of anything that has a flavour similar to aniseed, I love the depth of flavour and smokiness that star anise provides to dishes, and the cut of meat, caramelised by the palm sugar, made this dish melt in my mouth and became one of the best dishes I had eaten in a long time. You know that feeling when you take your first bite and it’s almost indescribably delicious, and you can’t believe that you actually cooked it! What really lifted this dish too, not that it needed lifting I suppose, was the addition of fresh slices of Lebanese cucumber and chopped coriander to the steamed rice. I thought to myself, yeah sure, it will probably be nice, but it surprised me how well it complimented and improved the pork, primarily I think because it provides a cold and crunchy contrast to the hot and caramelised pork. I’ll definitely prepare my rice like this much more in the future for such dishes.

Recipe (serves 3-4):

1kg pork belly
1 tbs peanut oil
8 eschallots
6 garlic cloves
60ml soy sauce
125g palm sugar
250ml water
2 whole star anise
1 tsp Chinese five spice
1 tbs fish sauce
8 spring onions
Jasmine Rice
1 Lebanese cucumber
½ cup coriander

Heat the oil in a wok over a high heat. Add 1/3 of the pork and stir-fry for 5 minutes or until brown. Repeat in two more batches.

Heat remaining oil in wok over medium heat. Add eschallots and garlic and cook for 5 minutes or until golden.

Add pork, soy sauce, palm sugar, water, star anise and five spice. Bring to the boil.

Reduce heat to low and cook, covered and stirring occasionally, for 1 hour or until the pork is tender.

Increase heat to high and bring to the boil. Cook for 10 minutes or until sauce thickens.

Add the fish sauce and ½ the spring onions and stir to combine.

Garnish with remaining spring onions and serve with rice topped with cucumber and coriander leaves.

Cuisine: Vietnamese
Source: http://www.taste.com.au/ (Winter) iPhone Application
Rating: Five stars